Showing posts with label Upcycling. Show all posts

Saturday, November 26, 2011

Make your own fake snow A TUTORIAL

Good afternoon everyone!!!  How was your Thanksgiving?  Ours was awesome!


I know that it’s been a while since I’ve posted anything cool, or anything at all for that matter!  BUT, we put our tree up last night and I started putting up the rest of my decorations and realized that I needed some fake snow.  You know that flakey fake plastic stuff that you can buy by the bag fulls??  Well we live in a tiny town that doesn’t ever have the things you need, so I made my own!!  Would you like to make your own??

009                027

I thought you might say that so here we go!!  The top 2 photos are examples of the before the snow, which is pretty, but missing something and the after with the snow.  What do you think??


First of all you need to gather about 5 white plastic bags.  I only used a little bit of what I made in the jars and I have a bunch left over so adjust according to how much you need.

Second you need to cut the colored part off of the bag.  Look at photo below

                                      015

Third you’re going to layer all of your bags together and roll them, scrunch them or just bunch them all up and start cutting!!!  See photo below


017                    018


And finally you have a container full of fake flaky snow!!!  So easy and so much cheaper than spending money on the store bought stuff!!!!!  And look how fluffy it looks

019                       022

                                    024

Now just put it wherever you want. Now if you have small children please don’t put it where they can put it in their mouths, they can and will choke!!!!

Have you started decorating yet?  I’d love to see!!  So until next time………..

Happy Decorating!!!!!!!!!!!

Monday, September 19, 2011

Tick Tock……

I can feel Christmas getting closer and closer and I seem to be getting farther and farther behind.  Does anyone else make a list of the things you MUST get done by a certain time and then find yourself constantly adding to that list?  If I could get my foot up far enough I would kick myself for adding to that list, but since I can’t I guess I better just keep sewing.
Remember me showing you this quilt top?  Well I finally got it basted and quilted and checked off the to do list.  What do yall think?
007 009 010
How fun is this?  I did not know I could tilt my photos!!  I think I found my new favorite thing!!

What do yall think about the green polka dotted back?  That’s a thrifted sheet!!!  Yep, yep it is and it worked perfectly I think for the color scheme of the quilt. I know my lines aren’t perfectly straight, but I think it turned out pretty good anyway.  I hope the next one will be better. 
I really need to perfect my basting method.  Any suggestions?  The fact that I have carpet all throughout my apartment and limited space does not help. 
Ok now onto the next thing I wanted to share.  Now that I’ve posted an up close and personal of the finished quilt, I have a question.  Do you see the sandy colored fabric in the above photos that creates the diamond shapes in the quilt?  Well I personally dyed all of that fabric with coffee and/or tea.  Do any of yall do that?
                                        005
I save all of the coffee that is left in the coffee pot in the mornings and I use it to dye thrifted white sheets.   Yes you read that right, I do not buy white fabric from the fabric store and I also do not buy any type of tan fabric unless I have tried to achieve a certain color and have failed epically!  But I must say that doesn’t happen very often because I have learned that if I dye the fabric first with tea and it isn’t dark enough, I let it dry then stick it in a bowl like the above photo of very hot coffee and let it soak for about an hour that usually does the trick.  Oh and I must mention this method makes me feel like I’m doing something good for the environment because I’m only using coffee or tea to dye the fabric and I used something from a second hand store!

Speaking of thrifted sheets I wanted to show yall some of my stash.
013                                 014
As you can see in the first photo, the second shelf isn’t as full as the top shelf.  The top shelf is 2 stacks deep and each stack is at least 7 sheets high.  The very front 2 stacks that are shorter than the others are pillow cases.  The second shelf is mostly solid colored sheets there are a few that you can’t see in this photo that are different shades of blue and purple (all thrifted).  Now the bottom shelf are our bath towels.  Is it a bad think when I have more vintage sheets that I do bath towels?  
I know I’ve probably babbled enough with this post, but I wanted to show you a sketch of the next quilt I am working on.  Keep an open mind because this is a very rough sketch and it gets worse because I had to take a picture of it because my scanner wasn’t cooperating.
                                      006
And the last thing I wanted to share today is that my kindergartener had homework for the first time the other evening!!  He was so excited, but I don’t think that will last!
                                         003

Thursday, July 14, 2011

Recovered nap mat

Good morning everyone!!  I have started to get back into my crafts, slowly but surely.

I’m sure most of yall have seen those ugly red and blue nap mats that the kids take to school for nap time.  Well we inherited a pretty well used one the other day and my oldest son Landon loved it, but I was ready to get rid of it as soon as we received it.  It was so worn there were several rips and tears all over it.   BUT since he wouldn’t let me throw it out I decided I would recover it and make it look much better so that I would at least feel a little better about him laying on it. 

            012 

Can you see the big tear right in the middle?  There are also several small rips and tears all over it.

            After

I found the fabric I used at Goodwill, it was a duvet cover that originally came from Ikea.  He LOVES it.  I am working on a pillow to go with it.  I love how it has the extra sheet part for him to cover up with.  This is going to be perfect for sleep overs or nap time at school.  And the next best part,  it still folds up and stores away nicely.

                                  020

See how nice it folds up, it won’t take up much space at all in their room so I guess we can hold on to this nap mat for a little while longer.  Oh and I also re-used the plastic that was covering the foam.  I cut it into squares and punched a hole through one of the corners making it into a type of dry erase book.  They can write all over the plastic and then wipe it clean.  So none of the original mat went to waste.  That’s my kind of project.  So what do you think?  So until next time….


Happy Crafting!!!

Monday, May 2, 2011

So much to share

Good afternoon everyone!!

We had such a busy weekend around here that I have several things to share with yall!!

  But first and foremost, today is my cousin's 28th birthday!!  Happy Birthday J, I wish you were still here so we could all celebrate with you, but I know that you are looking down on us from above and I know you can feel the love that we all have for you!!!  We miss you with all of our hearts and can't wait to see you again!!

Ok now onto a few things that aren't so sad today.  My oldest son played his first t-ball game on Saturday and it was so much fun to go and watch him play!!  They did so great!!

There was a point when he was playing third baseman and he was getting not action so he sat down and starting pulling up grass, it was so funny watching all the funny things kids do at this age.


Ok, now onto the other things that filled my weekend.  On Sunday my Aunt came over and we made hair bows for her t-ball team because she's a coach of an all girls t-ball team named the ladybugs and they have their first game this evening.  We had so much fun making the hair bows.  We found a tutorial on line that we followed, so if I can find it again I will definitely link back to it.

                                            The ladybugs have landed!!  Aren't they cute?!?
We also made these bows for them as well.  I think the plan is for the girls to wear the ladybugs on their visors and these bows in their hair.
Can you tell what color the team is?  We just loved these bows and they were a learning experience.  When we were done with these we just started messing around with some of the left over ribbon and this is the bow I came up with for one of my other nieces that lives about 20 miles away be cause the ribbon mathced her school colors.
Oh and she loved it by the way, I couldn't have been happier!!!  Ok, now onto the other project I've been working on.  My oldest son and my niece are in the same grade in school (pre-k) and they are going to be performing in their first program on Thursday for Cinco De Mayo.  They have to have a certain costume for the play that first in with the theme, so I did some research using google to try and find a simple dress I could make for my niece and this is what I came up with.
It was a very quick project.  I used one of the boys old t-shirts that had a stain on it and a piece of a dress that I bought at the thrift store quite awhile back and a piece of orange material from my stash to make the sash.  I also made a big flower for her to wear with from a piece of the dress and some felt.
So what do yall think?  Does it look like it will go along with holiday?  I sure hope so because she has to have it at school in the morning.  How busy was your weekend??  What did you do??  So until next time.............

Happy Crafting!!!

Thursday, February 3, 2011

Necessity, The mother of invention

This is so true!!!  I've called our local bank off and on today to get the temperature outside and through out the day the temps have varried.  We started at 8 degrees this morning with snow on the ground and now we're at 19 with a little more snow than earlier.  Now I know that some of you are use to cold weather, but here where I live this is a very Abnormal thing.  We've actually had 70 and even 80 degree weather this winter.  So needless to say we don't have a lot of cold weather clothing and we also don't have very many stores here in town that sale that type of clothing either.  Sooooo.........  I took 2 shirts, 1 that was a long sleeve shirt that was too small and a plain white t-shirt that had a stain on it, combined the 2 of them together and came up with this


I took the sleeves and the dinosaur off of the long sleeved shirt and added them both to the plain white t-shirt.  I sewed the long sleeves under the short sleeves on the white shirt.  I cut out the dinosaur and used heat bond to attach him to the shirt.  I actually stitched around the dino with my sewing machine just for extra stability (I tried it on him before I was completely done with it).  The word dino is freezer paper stenciled on a piece of the long sleeved shirt with white paint and heat bonded onto the shirt as well.  I used the Dino patch to cover up a stain that was on the shirt.  He really likes it and I had to pry it off of him so that I could finish stitching it up.  This was really simple and quick to make.


The best part about it is I didn't have to throw away either one of the shirts I was able to upcycle them both!!!

Oh and yes I know the pants don't match the shirt, but there was not getting him out of his car pajama pants today and it was too cold to go anywhere so I just left him alone.  Isn't he cute though and I think the shirt is almost equally as cute.  So until next time........

Happy Crafting!!!


Wednesday, January 19, 2011

Reverse applique Denim coasters

These were made to fit in with Valentine decorations.  I don't usually decorate for any other holidays other than Halloween and Christmas, but I figured that since I'm trying to blog more this year I would try to get more into it. 

As a crafter I seem to have hoarding tendencies towards crafts supplies and scrap pieces of fabric (ah I finally admitted it).  Isn't that the first step to recovery?  Ha Ha anyways back to what I was saying.  So because of this I have plenty of pieces of denim laying around that are just waiting to be used.  I'm saving the larger pieces for a quilt later down the road, but I figured the smaller pieces would be great for projects like these. 

I love the way the denim looks when it's frayed on the edges so I just top stitched the two pieces together so that the edges would fray.  I used a darning foot for my sweing machine so that I could stitch around the hearts and write Love on the coasters. 


These were very simple to make and lots of fun.  I've made several more I just didn't manage to get photos of them.  So until next time........

Happy Crafting!!!!

Tuesday, January 18, 2011

Simple flower brooch with wrist warmers (mini tutorial)

These flowers are everywhere in my house right now so I have lots of things planned for them.  This is another project using them. 

These are wrist warmers made from the sleves of an old sweater.  The booches that are on them can be taken off and swithced out to match other outfits. 


I have started to love the color red !! I also love all shades of turquoise and aqua but there's just something about red.  Seeing it in the winter time seems to bring me out of the winter blues and brighten my day.  Does red effect any off yall that way?  Or do you have a certain color that just puts you in a better mood everytime you see it?

Oh and if you look at these photos very closely you can see some of my many rings that I was talking about in my last post.  And while I'm talking about my last post, I think these are something I will wear unlike all of the jewelry I've made.  I love them and as soon as I made them I just had to wear them.  They are so comfy and I think a big part of that is because they are made out of an old sweater. 


These brooches can be worn on the wrist warmers or on a sweater of shirt.  They could even be attatched to a headband.  This is a pretty simple project that only took me about 10 minutes to put together.  Below is a pretty simple step by step tutorial for these brooches.

Tutorial For the Brooch

1. Follow this tutorial to make the flowers

2. Cut about a 13" of lace and stitch a running stitch along the lace and pull the string to make a ruffle when you get the the end.

3. Tie a knot in the 2 ends of the string to make a circle.

4. Cut a small circle of felt to hot glue onto the back of the lace circle.

5. Cut a leaf shape out of a green colored piece of felt and hot glue wherever you want it on the top part of the
lace and then glue your flower ontop of the leaf.

6. You can use a safety pin or a brooch back on the circle piece of felt that you hot glued to the back of the lace.
If you are using a brooch back you can hot glue it, but if you're using a safety pin I suggest sewing it to the back of the felt.

I hope that this mini tutorial was detailed and simple enough.  If there are any questions please don't hesitate to ask and I will do my best to clear it up for you.  So until next time..........

Happy Crafting!!!

Friday, January 14, 2011

Monogrammed Magazine coasters

YAY it's Friday!!! 

I was given a bunch of magazine's back when I was making Christmas trees out of magazines for a craft show, and needless to say I was given more than I could use at the time.  So I've been doing a lot of thinking and crafting to come up with things I could make out of all these extra magazines.

One of the projects I came up with were up cycled monogrammed magazine coasters.  These two that are in the photograph are covered in iron on vinyl to protect them so that they will last longer.  I felt like I was making ransom notes when I was cutting all the different letters out of the magazines.  These were very simple to make and didn't take much time at all.  It is so wonderful to know that I helped by not cluttering up the dump ground with more trash that could be used for something else!!


I will be posting a few more things that I've used these magazines for in the future so keep checking back for more posts.  So until next time........

Happy Crafting!!!

Wednesday, January 5, 2011

Denim bracelet

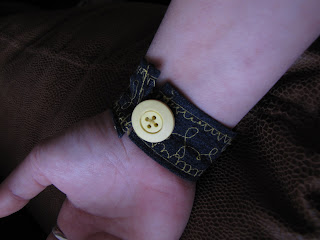
This was a quick throw together project that I did last night it took me maybe 20 minutes all together.  This was more of a way to get me back into sewing.  I haven't sewn anything in over a month and my machine was crying out for some attention.  All I used were things that I had on hand, scrap pieces of denim from an old skirt and leather samples I got for free from a garage sale.  This is a 100% upcycle project.  I'm not much of a bracelet person so this one will probably go to my oldest niece.  I plan on making a few more so I will come up with a tutorial in the near future incase anyone is interested.  I hope everyone is haveing a great Wednesday and I hope the rest of you week is even better.


So sorry for the horrible photos, I was having to shoot one handed so they didn't turn out as clear as they should have.  So until next time.......
Happy Crafting!!!

Total Pageviews

Related Posts Plugin for WordPress, Blogger...